From View Metadata to Automation: Lineage and Bulk View Deployment in Microsoft Fabric
A step-by-step guide to extracting Fabric view definitions into metadata tables, then reusing those same tables to power the Rayfin data lineage app and to deploy views into production.
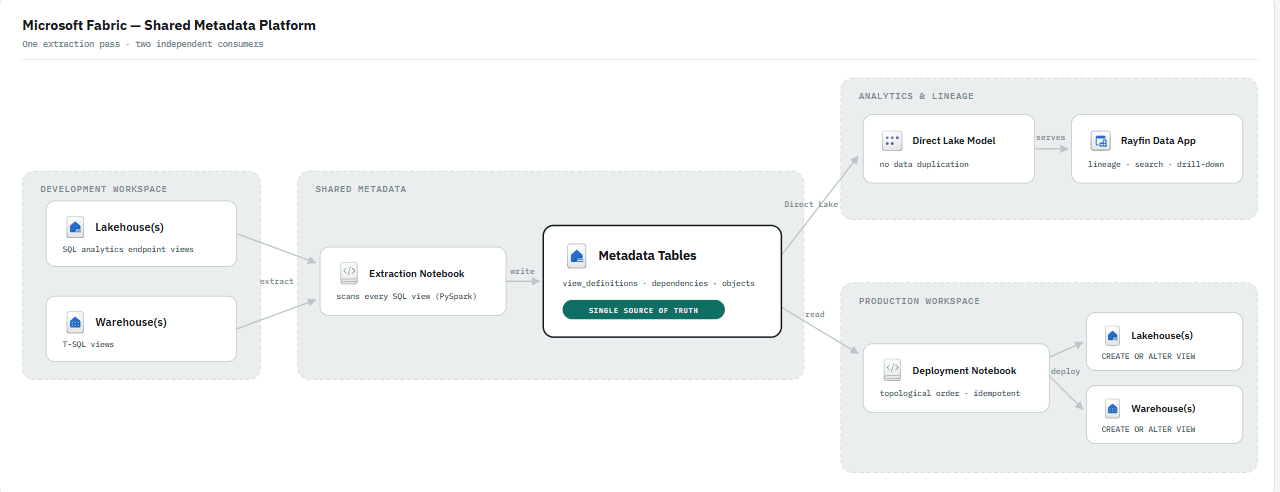
If your Fabric workspace has more than a handful of lakehouses and warehouses, two things get repetitive fast: figuring out what depends on what, and manually recreating views every time you promote something to production.
This guide extracts every view definition in a development workspace into three metadata tables — once — and then reuses those same tables for two things: data lineage and bulk view deployment. You don't build two solutions. You build one metadata layer and point two consumers at it.
Architecture
Two paths, one source:
Lineage: Dev Workspace → extraction notebook → metadata schema (3 tables) → Rayfin data app.
Deployment: Same metadata tables (used directly, or via shortcuts) → deployment notebook, repointed at the target Lakehouse → views created in Production.
Everything below is just the steps to stand up each path.
Part 1 — Create the Metadata Tables
Extract View Definitions from the Dev Workspace
- Open
notebooks/extract-view-definitions.ipynb(Notebook 1, referenced again at the bottom of this post) in your Fabric workspace — it needs a default Lakehouse attached with custom schemas enabled. - Run it against your Development workspace.
- It scans every SQL view across your lakehouses and warehouses.
- It creates a metadata schema.
- It writes three tables into that schema:
objects,dependencies, andview_definitions.
That's it — no configuration beyond pointing it at the right workspace. These three tables are the foundation for both parts that follow, so run this first.
Part 2 — Create Data Lineage
Use the Metadata Tables for Data Lineage
The Rayfin data lineage app — github.com/AbdulAlimPUST/Fabric-Data-Lineage-Rayfin-App ↗ — is a ready-made implementation. You don't build a lineage UI from scratch; you point it at your tables.
-
Clone the project and install dependencies:
git clone https://github.com/AbdulAlimPUST/Fabric-Data-Lineage-Rayfin-App.git cd Fabric-Data-Lineage-Rayfin-App npm install -
Create the semantic model directly in Fabric — not Power BI. Since this is Direct Lake, there's no separate Power BI Desktop authoring step and no import/refresh schedule to manage. From the Lakehouse (or Warehouse) that holds your three metadata tables, use New semantic model in the Fabric workspace and add
objects,dependencies, andview_definitions. The model reads the OneLake Delta files directly — no data is copied or duplicated. -
Don't add relationships between the three tables. Leave them unrelated in the model. The app queries each one independently via its own DAX query and joins them client-side.
-
Register the semantic model as the app's connection, via the project's
fabric-app-dataCLI:npx fabric-app-data add semanticModel lineageModel --workspace <your-workspace-id> --item <your-semantic-model-id> # or, simpler — paste the model's URL from the Fabric portal: npx fabric-app-data add semanticModel lineageModel --from-url "<Power BI/Fabric portal URL>"The alias must stay
lineageModel— see the project'sTEMPLATE.mdfor the exact column contract each of the three tables needs to expose, and how to add this as a named profile if you're keeping other targets around. -
Sign in, then deploy once. You don't create the Fabric App item yourself first — this creates it:
az login npx rayfin login npm run build npx rayfin up -w "<your workspace name>" -
Iterate locally against that item. Run the dev server, then open the Fabric App item
rayfin upjust created in the portal and append&devUri=http://localhost:5173to its URL — this points the embed shell at your local dev server instead of the last deployed build:npm run devRedeploy the same way (
npm run build && npx rayfin up) whenever you want to push a change live — see the projectREADMEfor the full flow. -
Open the app. It reads the three tables via DAX, joins them into a dependency graph, and renders lineage as an interactive canvas, a decomposition tree, and a flat dependency table — with search, per-item/object-type filtering, and full upstream/downstream impact analysis on any selected object.
The project's own README and TEMPLATE.md are written to stand alone — clone it and you're not dependent on this post to configure it.
Part 3 — Deploy Views to Production
Reuse the Same Metadata for Deployment
The same three tables from Part 1 are also the deployment source. Two ways to make them available to Production:
Option 1 — Use the tables directly. Point the deployment notebook straight at the Development workspace's metadata tables.
Option 2 — Create shortcuts. Shortcut the three tables into the Production workspace's Lakehouse and point the deployment notebook at the shortcuts instead.
Either works — pick whichever fits your workspace access model.
Run the Deployment Notebook
- Confirm the three metadata tables are reachable (directly, or via shortcuts from Option 2).
- If using shortcuts, create them in the target workspace first.
- Repoint the deployment notebook (Notebook 2) at the correct Lakehouse.
- Run it.
- It reads the metadata and creates or updates the views in the production workspace.
Keep every Lakehouse, Warehouse, schema, and relevant object name exactly the same as in the Development workspace. The deployment notebook assumes matching names across environments — if a schema or item is renamed between dev and prod, repoint the notebook's mapping before running it.
Final Result
- View definitions extracted from Development.
- Metadata schema and three metadata tables created.
- Rayfin app using those tables to show live data lineage.
- The same metadata reused, unchanged, as the deployment source.
- Views created in Production by the deployment notebook.
Notebooks and Project
| Asset | Use it for |
|---|---|
| Notebook 1 — Extract View Metadata ↗ | Run first, against Development. Creates the metadata schema and the three tables everything else depends on. |
| Rayfin Project — Data Lineage ↗ | Clone and repoint at your metadata tables to get lineage, search, and impact analysis with no custom build. |
| Notebook 2 — Deploy Views | Run against the metadata tables (direct or via shortcuts) to create/update views in your target workspace. |
Extract once. Reuse the same tables for lineage and for deployment.